
Understanding Chamfer Bits and Their Applications
What Are Chamfer Bits?
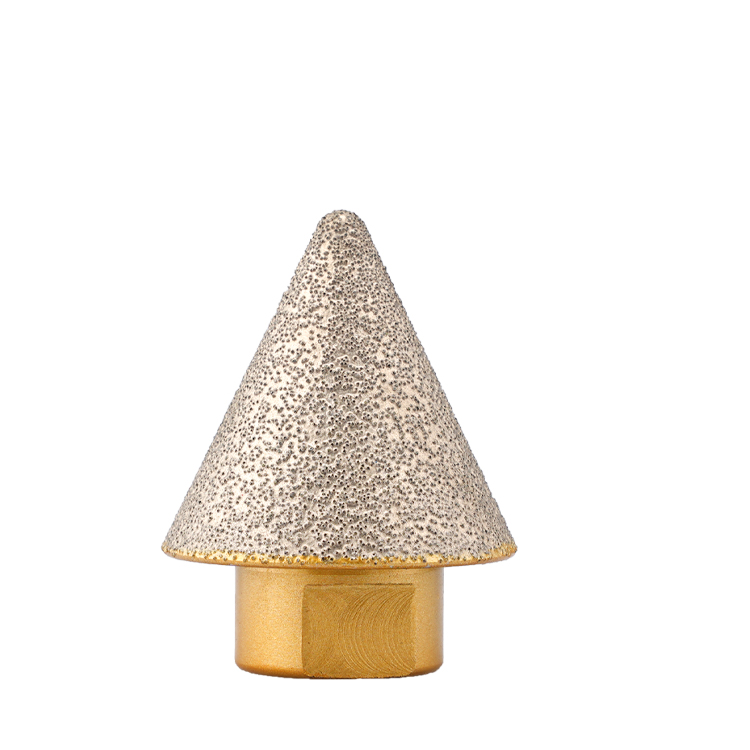
Chamfer bits are specialized tools designed to create angled edges on various materials, enhancing both their appearance and functionality. These bits feature distinct angled edges that facilitate smooth transitions between surfaces, making them invaluable for achieving refined finishes. In design aesthetics, chamfer bits are critical, as they allow for the creation of seamless edges and corners that improve the visual appeal of projects. Whether in woodworking or metalworking, the precision offered by chamfer bits can vastly elevate the quality of a finished product.
Key Differences Between Bevels and Miter Cuts
Understanding the distinction between bevel cuts and miter cuts is essential in choosing the right one for your project. Bevel cuts involve cutting an edge at an angle to the face of a material, whereas miter cuts create an angle across the width of the material. The choice between these cuts typically depends on the desired outcome; for example, miter cuts are often preferred in creating picture frames, while bevel cuts are ideal for edge finishing on furniture. By mastering these techniques, one can achieve both functional and aesthetically pleasing results in woodworking projects.
Common Uses in Woodworking and Metalworking
Chamfer bits find extensive applications in both woodworking and metalworking industries. In woodworking, these bits are used for creating elegant furniture edges and ensuring smooth transitions in cabinetry, which enhances durability and visual appeal. The metalworking industry also leverages chamfer bits for machining operations where precision cutting is necessary. Beyond wood and metal, chamfer bits can effectively handle materials like plastics, proving their versatility across different projects. From intricate designs to durable construction, the uses of chamfer bits are both diverse and essential to achieving high-quality craftsmanship.
Choosing the Right Chamfer Bit for the Job
Material Compatibility: From Wood to Porcelain Tile
Selecting the correct chamfer bit for your project hinges on material compatibility, ranging from softwoods to tougher substances like porcelain and granite. Chamfer bits can be effectively used with these materials, but choosing the right bit is crucial due to variations in material density. Softwoods and engineered products require bits that smoothly cut through without causing splintering or damage. Furthermore, utilizing diamond drill bits becomes essential when working with harder materials. Specifically, for tasks involving diamond drill bits for porcelain tile, these specialized bits ensure precision and resilience, preventing chips and cracks in tough substrates. Therefore, understanding the material you're working with is key to achieving the desired results without compromising the quality of the edges.
Angle Selection: 30°, 45°, and 60° Options
Angle selection is pivotal in chamfering, significantly affecting the edge finish of your project. Different angles serve varied purposes, from aesthetics to functionality. For instance, a 30° angle is often used in decorative elements, adding subtlety and elegance by gently softening edges. On the other hand, a 45° angle is the go-to for most woodworking joints, providing a balance between structural integrity and visual appeal. Lastly, a 60° angle is utilized for more pronounced chamfers, crucial for projects demanding bolder transitions. Guidelines to determine the appropriate angle include considering the design objectives, material type, and intended durability. By understanding these aspects, one can effectively choose the best angle to meet specific project needs.
Diamond vs. Carbide: When to Use Specialty Bits
When deciding between diamond and carbide bits, understanding their characteristics helps in selecting the right tool for specific applications. Diamond drill bits deliver exceptional hardness and durability, making them ideal for cutting through robust materials such as glass, marble, and porcelain. Evidence from industry experts suggests that diamond bits excel in projects requiring precision and longevity, particularly for challenging materials. Conversely, carbide bits are known for their efficiency in softer and medium-hard materials due to their cost-effectiveness and versatility. While both types of bits have their strengths and ideal applications, choosing the right one depends on the project's material requirements and expected performance.
Step-by-Step Guide to Perfect Bevels
Setting Up Your Router for Precision
Setting up a router accurately is crucial for achieving precise bevels without mistakes. Begin by gathering essential tools like a square, wrenches, and safety gear. Ensure the router base is securely attached and the bit is properly aligned. Calibration plays a vital role—use precise measurements to adjust the router depth for consistent cuts. Always perform a test run on scrap material to verify settings before starting your project. Safety is paramount; always wear protective eyewear and gloves, and ensure the work area is free of clutter to prevent accidents. By thoroughly preparing your router setup, you can achieve clean and precise bevel cuts.
Cutting Techniques for Different Angles
Different bevel cuts demand specific techniques based on the angle required. For achieving bevels at various angles, it's essential to adjust your cutting method accordingly. Maintain a steady hand and consistent feed rate, which is vital for reducing tear-out and ensuring a clean cut. Practicing on scrap material can aid in mastering your technique and boosts confidence when cutting exact angles on your main project. This practice ensures the preservation of the final product's integrity and appearance, thus highlighting the importance of precision and skill in bevel cutting.
Smoothing and Finishing Edges
After beveling, the edges need smoothing and finishing for a polished look. Sandpaper or files are commonly used tools for this process, tapering down any rough edges seamlessly. Experts suggest applying gradual pressure with the sandpaper, starting with coarser grits and finishing with finer ones for the best results. This step is crucial not only for aesthetics but also for enhancing the quality of your project by eliminating imperfections like splinters or blemishes. Proper finishing highlights the dedication to craftsmanship, resulting in professional and visually impressive work.
Mastering Challenging Projects with Chamfer Bits
Working with Irregular Shapes and Curves
Working with irregular shapes requires finesse, especially when incorporating chamfer bits into the mix. Effective techniques involve carefully adjusting router setups to accommodate uneven surfaces, ensuring precise cuts that conform to the unique contours of the material. Some chamfer bit shapes, like diamond drill bits for porcelain tile and granite, excel in producing smooth finishes on non-standard shapes. Visualizing the results ahead of time can be immensely helpful; considering sketches or mock-ups can guide you toward achieving the desired profile. Mastering these techniques equips you to tackle projects unruly with irregular shapes effectively.
Large-Scale Bevelling on Countertops and Tables
Large-scale beveling on countertops and tables can be challenging due to the expansive surface area involved. Essential tools for such projects include routers, diamond core drill bits, and high-quality chamfer bits, which can provide the consistency needed. Best practices include ensuring steady movement along the material, achieving uniform edge quality that is both visually appealing and structurally sound. Safety should be prioritized—proper support and stabilization of the materials during cutting help prevent accidents. Approaching these challenges with a rigorous plan ensures immaculate bevels on substantial surfaces.
Avoiding Tearout on Delicate Materials
Delicate materials require prudent techniques to avoid tearout when beveling. Using backing tape can protect the surface and reduce the risk of tearing. Router speed and the type of bit are crucial; diamond drill bits for marble and glass can aid in minimizing tearout under controlled speeds. Insights from woodworking experts underscore the efficacy of these methods, often supported by anecdotal successes within the field. Understanding the nuances of each technique and applying them tactically can safeguard the integrity of delicate projects while achieving a precise beveled finish.
Pro Tips for Longevity and Safety
Maintaining Sharpness in Diamond Drill Bits
Maintaining the sharpness of diamond drill bits is crucial for optimal performance and extended lifespan. Sharp drill bits reduce the risk of material damage and ensure precision in tasks involving materials like granite, glass, and marble. To effectively maintain diamond bits, start by cleaning them thoroughly after each use to remove debris and residue. Regularly inspect the bits for signs of wear and tear, replacing them if necessary. Expert recommendations suggest using specialized sharpening tools designed for diamond bits to refine their edges and maintain sharpness. According to user experiences shared in woodworking forums, routine maintenance significantly extends the lifespan of diamond drill bits, making them a worthwhile investment in the long run.
Dust Management and Bit Cooling Strategies
Effective dust management and bit cooling strategies are essential to safeguard health and extend tool longevity during chamfering processes. Dust accumulation can impair visibility, increase health risks, and reduce tool efficiency. Implement dust extraction systems or use attachments designed to minimize dust when working with diamond drill bits for materials like porcelain tile. Cooling methods, such as using water or air to prevent overheating, are equally important, especially during intensive use. Maintaining a balance between cooling and dust management not only prolongs the life of your diamond drill bits but also ensures consistent performance. Health and safety are paramount, so consider incorporating both strategies into regular practice.
Troubleshooting Common Bevelling Issues
Identifying and troubleshooting common beveling issues can significantly enhance the quality and efficiency of your projects. Typical problems include tearout, uneven cuts, and tool jamming, which can disrupt work and damage materials. Troubleshooting starts with evaluating your technique and checking tool maintenance. Ensuring sharp bits and adequate cooling can prevent many common problems. Proper documentation of challenges encountered and the solutions applied can serve as a future reference and learning tool. This practice aids in recognizing patterns in the issues faced and refining techniques to ensure smoother, more efficient beveling experiences.